0%

初始化项目

创建项目

1
2
3
4
yarn create @vitejs/app <project-name>

# 或者
npm init @vitejs/app <project-name>

博主以yarn来示例:

1
yarn create @vitejs/app vue3_demo

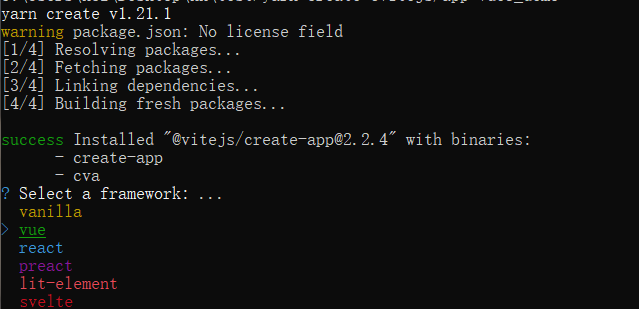
此时按下回车,可以看到以下页面,博主选择的是 vue(上下键可以切换选择的模板)

image-20210424174435740

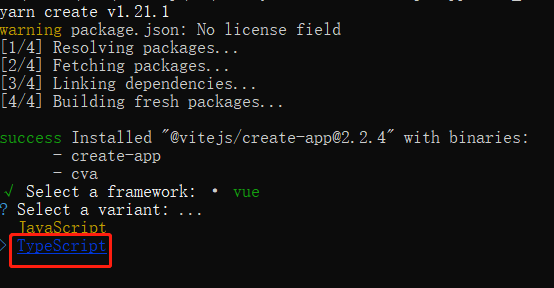
然后可以选择使用Typescript,博主这里选择Typescript

image-20210424174558205

之后

1
2
3
cd vue3_demo
npm install
npm run dev

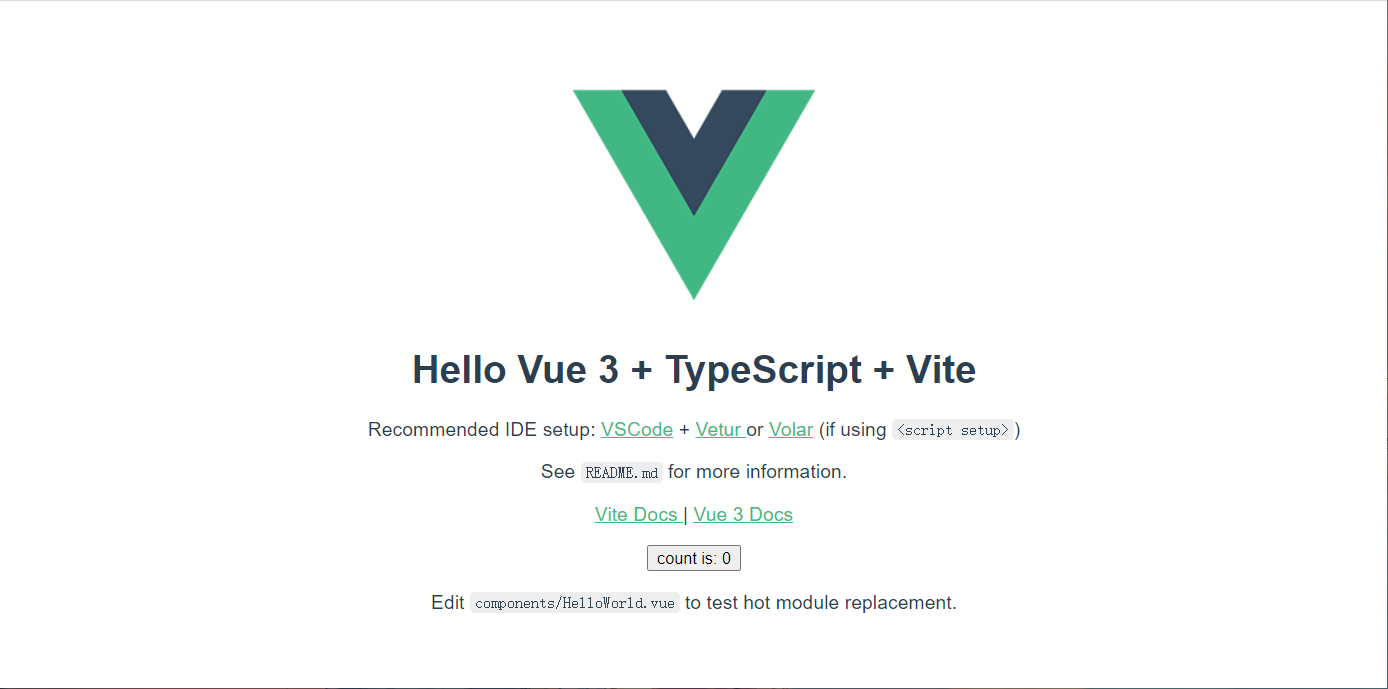
就可以看到项目模板运行之后的样子,本地访问 http://localhost:3000/

image-20210424175120399

安装 vue-router

1
yarn add vue-router@next

src目录下新建router/index.ts

1
2
3
4
5
6
7
8
9
10
11
12
13
14
15
16
17
18
19
20
21
22
23
24
25
26
27
import { createRouter, createWebHistory, RouteRecordRaw } from 'vue-router'
const routes: Array<RouteRecordRaw> = [
{
path: '',
redirect: (_) => {
return { path: '/home' }
},
},
{
path: '/home',
name: 'home',
component: () => import('../views/Home.vue'),
},

]
const router = createRouter({
history: createWebHistory(''),
routes,
scrollBehavior() {
return {
el: '#app',
top: 0,
behavior: 'smooth',
}
},
})
export default router

src目录下新建views/Home.ts

1
2
3
4
5
<template>
<div>
hello vue3 + ts
</div>
</template>

main.ts中引入router并挂载

1
2
3
4
import { createApp } from 'vue'
import App from './App.vue'
import router from './router'
createApp(App).use(router).mount('#app')

再次启动项目可以看到我们已经可以通过路由访问了:http://localhost:3000/home

问题vue项目不兼容ie

要求:ie兼容 >= 9

环境:vue cli3以上版本搭建的项目

Installation

1
2
3
npm install babel/polyfill --save
# or
yarn add babel/polyfill

修改babel.config.js文件

1
2
3
4
5
6
7
8
9
10
11
12
module.exports = {
presets: [
'@vue/app',
// 兼容配置
[
'@babel/preset-env',
{
'useBuiltIns': 'entry'
}
]
]
}

main.js文件(项目入口)

1
2
3
4
// 在顶部引入@babel/polyfill处理兼容,以确保首先加载polyfill
import '@babel/polyfill'

import Vue from 'vue'

重启项目如果没有报错,就已经完成了,如果在编译时出现以下错误,

1
To install them, you can run: npm install --save core-js/modules/es6.array.copy-within core-js/modules/es6.array.fill core-js/modules/es6.array.find core-js/modules/es6.array.find-index core-js/modules/es6.array.from core-js/modules/es6.array.iterator core-js/modules/es6.array.of core-js/modules/es6.array.species core-js/modules/es6.date.to-primitive core-js/modules/es6.function.has-instance core-js/modules/es6.function.name core-js/modules/es6.map core-js/modules/es6.math.acosh core-js/modules/es6.math.asinh core-js/modules/es6.math.atanh core-js/modules/es6.math.cbrt core-js/modules/es6

这是因为最新的 vue-cli 版本,core-js是3.x的版本,而这个版本中,对那些polly补丁包进行了整理,所以,在项目的根目录,yarn add core-js@2.6.9 --save安装这个版本就没问题

参考文章:

ant-design-vue的兼容问题

npm 解决缺失 core-js 的问题,遇到core-js/modules/es6.regexp.replace 问题

monaco-editor 简介

monaco-editor是为VS Code提供支持的代码编辑器,支持IE 11,Edge,Chrome,Firefox,Safari和Opera,兼容VS Code的快键键

安装依赖

1
2
3
4
5
npm install monaco-editor --save
npm install monaco-editor-webpack-plugin --save-dev
# OR
yarn add monaco-editor
yarn add monaco-editor-webpack-plugin

在vue.config.js文件下配置

1
2
3
4
5
6
7
8
9
10
11
12
const MonacoWebpackPlugin = require("monaco-editor-webpack-plugin");

module.exports = {
configureWebpack: {
plugins: [
new MonacoWebpackPlugin({
languages: ["json"],// 配置需要的languages,减少打包后的体积
output: "./static/js/monaco-editor"
})
]
}
}

定义monaco组件

1
2
3
4
5
6
7
8
9
10
11
12
13
14
15
16
17
18
19
20
21
22
23
24
25
26
27
28
29
30
31
32
33
34
35
36
37
38
39
40
41
42
43
44
45
46
47
48
49
50
51
52
53
54
55
56
<template>
<div
ref="container"
class="monaco-editor"
:style="`height: ${height}px`"
></div>
</template>

<script>
import * as monaco from "monaco-editor";
export default {
name: "Monaco",
props: {
monacoOptions: {
type: Object,
default: () => {
return {
value: "", // 编辑器的值
theme: "vs-dark", // 编辑器主题:vs, hc-black, or vs-dark,更多选择详见官网
roundedSelection: false, // 右侧不显示编辑器预览框
autoIndent: true // 自动缩进
};
}
},
height: {
type: Number,
default: 300
}
},
mounted() {
this.init();
},
methods: {
init() {
// 初始化container的内容,销毁之前生成的编辑器
this.$refs.container.innerHTML = "";

this.editorOptions = this.monacoOptions;
// 生成编辑器对象
this.monacoEditor = monaco.editor.create(
this.$refs.container,
this.editorOptions
);
// 编辑器内容发生改变时触发
this.monacoEditor.onDidChangeModelContent(() => {
this.$emit("change", this.monacoEditor.getValue());
this.$emit("input", this.monacoEditor.getValue());
});
},
// 供父组件调用手动获取值
getVal() {
return this.monacoEditor.getValue();
}
}
};
</script>

使用组件

1
2
3
4
5
6
7
8
9
10
11
12
13
14
15
16
17
18
19
20
21
22
23
24
25
26
27
28
29
30
31
32
33
34
35
<template>
<div>
<monaco
ref="monaco"
@change="handleChange"
:monacoOptions="monacoOptions"
v-model="monacoOptions.value"
:height="580"
></monaco>
</div>
</template>
<script>
import monaco from "../../Manaco/manaco";
export default {
name: "demo",
data() {
return {
monacoOptions: {
value: "",
readOnly: false, // 是否只读
language: "json", // 语言类型
theme: "vs-dark" // 编辑器主题
}
};
},
components: {
monaco
},
methods:{
handleChange(val){
console.log(val)
}
}
};
</script>

环境安装

  • Nodejs 安装,具体安装步骤自行百度,不做赘述
  • vue/cli 安装
1
2
3
4
5
6
// 安装命令
npm i -g @vue/cli

// 查看版本
vue -V
// @vue/cli 4.0.5

创建项目

  • 使用vue/cli创建项目
1
vue create cesium-demo
  • 安装Cesium
1
npm i cesium --save

配置webpack

使用 Vue CLI 3 创建的项目,需要在目录下新建 vue.config.js 文件对 webpack 进行配置,帮助文件参见 vue.config.js

安装 webpack 插件

copy-webpack-plugin // 用于拷贝项目文件至 build 文件

strip-pragma-loader(生产环境)// 用于在生产环境中移除 errors 和 warnings

1
npm i strip-pragma-loader copy-webpack-plugin --save-dev

在根目录新建vue.config.js 示例

Cesium 的 webpack 配置参见 cesium-webpack-example

1
2
3
4
5
6
7
8
9
10
11
12
13
14
15
16
17
18
19
20
21
22
23
24
25
26
27
28
29
30
31
32
33
34
35
36
37
38
39
40
41
42
43
44
45
46
47
48
49
50
51
52
53
54
55
56
57
58
59
60
61
62
63
64
65
const webpack = require('webpack')
const path = require('path')
const CopyWebpackPlugin = require('copy-webpack-plugin')
const cesiumSource = 'node_modules/cesium/Source'
const cesiumWorkers = '../Build/Cesium/Workers'

module.exports = {
publicPath: './',
assetsDir: './static',
productionSourceMap: false,
devServer: {
open: true
},
chainWebpack: config => {
config
.node.set('fs', 'empty').end()
.resolve.alias.set('cesium', path.resolve(__dirname, cesiumSource)).end().end()
.amd({
toUrlUndefined: true
})
.module
.set('unknownContextCritical', false)
.rule()
.include
.add(path.resolve(__dirname, cesiumSource))
.end()
.post()
.pre()
.test(/\.js$/)
.use('strip')
.loader('strip-pragma-loader')
.options({
pragmas: {
debug: false
}
})
.end()
.end()
},
configureWebpack: config => {
let plugins = []
if (process.env.NODE_ENV === 'production') {
plugins = [
new webpack.DefinePlugin({
'CESIUM_BASE_URL': JSON.stringify('static')
}),
new CopyWebpackPlugin([ { from: path.join(cesiumSource, cesiumWorkers), to: 'static/Workers' } ]),
new CopyWebpackPlugin([ { from: path.join(cesiumSource, 'Assets'), to: 'static/Assets' } ]),
new CopyWebpackPlugin([ { from: path.join(cesiumSource, 'Widgets'), to: 'static/Widgets' } ])
]
} else {
plugins = [
new webpack.DefinePlugin({
'CESIUM_BASE_URL': JSON.stringify('')
}),
new CopyWebpackPlugin([ { from: path.join(cesiumSource, cesiumWorkers), to: 'Workers' } ]),
new CopyWebpackPlugin([ { from: path.join(cesiumSource, 'Assets'), to: 'Assets' } ]),
new CopyWebpackPlugin([ { from: path.join(cesiumSource, 'Widgets'), to: 'Widgets' } ])
]
}
return {
plugins: plugins
}
}
}

在main.js导入cesium

1
2
3
4
// 引入cesium
import 'cesium/Widgets/widgets.css'
let Cesium = require('cesium/Cesium')
Vue.prototype.Cesium = Cesium

创建Cesium组件

在src/components文件夹下创建Cesium.vue文件

1
2
3
4
5
6
7
8
9
10
11
12
13
14
15
16
17
18
19
20
21
22
23
24
25
26
27
28
29
30
31
32
33
34
35
36
<template>
<div id="CesiumContent"></div>
</template>
<script>
export default {
name: 'Cesium',
methods: {
initCesium () {
// 加载谷歌卫星地图
let url = 'http://mt1.google.cn/vt/lyrs=s&h1=zh-CN&x={x}&y={y}&z={z}&s=Gali'
let google = new this.Cesium.UrlTemplateImageryProvider({ url: url })

// 初始化
let viewer = new this.Cesium.Viewer('CesiumContent', {
baseLayerPicker: false,
imageryProvider: google,
terrainProvider: this.Cesium.createWorldTerrain({ // 添加地形
requestWaterMask: true,
requestVertexNormals: true
})
})
// 组件初始化完成,触发ready事件
this.$emit('ready', viewer)
}
},
mounted () {
this.initCesium()
}
}
</script>
<style scoped>
#CesiumContent{
height:100vh;
width:100vw;
}
</style>

使用组件

在对应的.vue文件引入cesium组件,或者复制下面代码到src/app.vue查看效果

1
2
3
4
5
6
7
8
9
10
11
12
13
14
15
16
17
18
19
20
21
22
<template>
<div class="home">
<cesium @ready="handleReady" />
</div>
</template>

<script>
import cesium from '@/components/Cesium.vue'
export default {
components: {
cesium
},
methods: {
handleReady (viewer) {
console.log('cesium加载完成')
}
},
mounted () {

}
}
</script>

到这里已经将cesium集成到vue了,可以愉快开发了

cesium API使用记录

  • 加载谷歌影像,及初始化
1
2
3
4
5
6
7
8
9
10
11
12
13
// 加载谷歌卫星地图
let url = 'http://mt1.google.cn/vt/lyrs=s&h1=zh-CN&x={x}&y={y}&z={z}&s=Gali';
let google = new Cesium.UrlTemplateImageryProvider({url:url});

// 初始化
let viewer = new Cesium.Viewer('app',{
baseLayerPicker: false,
imageryProvider: google,
terrainProvider: Cesium.createWorldTerrain({
requestWaterMask: true,
requestVertexNormals: true
})
});
  • 相机默认视角
1
2
3
4
5
6
7
8
viewer.camera.setView({
destination: Cesium.Cartesian3.fromDegrees(110.828918, 24.831243, 90.0), // 坐标位置,及高度
orientation: {
heading: Cesium.Math.toRadians(0), // X轴左右视角
pitch: Cesium.Math.toRadians(-90), // Y轴上下视角
roll: 0.0 // z轴旋转相机
}
});
  • 相机调整-带动画
1
2
3
viewer.camera.flyTo({  
destination : Cesium.Cartesian3.fromDegrees(-75.62898254394531, 40.02804946899414, 90.0)
});
  • gltf模型载入
1
2
3
4
5
6
7
var scene = viewer.scene;
var modelMatrix = Cesium.Transforms.eastNorthUpToFixedFrame(Cesium.Cartesian3.fromDegrees(110.828918, 24.831243, 80.0));
var model = scene.primitives.add(Cesium.Model.fromGltf({
url: './k.gltf', //载入当前路径下的k.gltf
modelMatrix: modelMatrix,
scale: 3.0
}));
  • 加载3D Tiles
1
2
3
4
5
6
7
8
9
10
11
12
13
14
15
16
17
// 这里使用官方的3D Tiles数据,加载纽约区域的
let city = viewer.scene.primitives.add(new Cesium.Cesium3DTileset({url: Cesium.IonResource.fromAssetId(3839)}));
// 根据模型高度,设置不同颜色
let heightStyle = new Cesium.Cesium3DTileStyle({
color: {
conditions:[
["${height} >= 300","rgba(45,0,75,0.5)"],
["${height} >= 200","rgb(102,71,151)"],
["${height} >= 100","rgb(170,162,204)"],
["${height} >= 50","rgb(60,102,204)"],
["${height} >= 20","rgb(190,102,84)"],
["${height} >= 10","rgb(155,80,164)"],
["true","rgb(170,162,204)"],
]
}
});
city.style = heightStyle;

项目介绍

这是一个基于vue和ant-design-vue实现的表单设计器,主要功能是可以通过拖拽生成表单,最后能导出相应的json数据,并且能通过导出的json数据构建成表单

为何要写这个项目

因为我们这边需要开发工作流,而我们没有自己的表单设计器,本来是有打算买一个第三方的表单设计器来用的,但是我个人觉得第三方可扩展性不能满足我们这边的需要,而且需要额外安装一个UI(原框架使用ant-design-vue),所以就决定自己写一个表单设计器

心得

这是我做的第一个npm组件,写在博客这里记录一下

写这个项目,我学会了如何将组件封装成npm包并上传,开源项目文档编写,对于vue和npm都有了更深入的了解,我相信有付出就有收获

2019-11-20

因为是第一次将vue的组件打包并上传到npm上,当我成功通过 npm install 安装时,我内心也是十分激动的,为了打包这个组件,我去网上查了很多资料,也学到了很多东西,我打算后期继续维护更新这个项目

开源地址
npm包地址

vue事件修饰符

  • stop 禁止冒泡
  • once 只触发一次,单次事件
  • prevent 组件默认事件
  • native 启用原生事件(组件)
  • keycode|name 筛选按键
  • self
  • capture

computed-计算属性

  • 缓存-性能
  • 方便
  • 可读、写
  • 属性的形式
    1
    2
    3
    4
    5
    6
    7
    8
    9
    10
    11
    12
    computed:{
    name: {
    get(){
    <!-- 可读 -->
    return this.value
    },
    set(value){
    <!-- 可写 -->
    this.value = value
    }
    }
    }

watch-监听

  • 监听属性,当属性改变触发事件
    1
    2
    3
    4
    5
    watch:{
    name(){
    console.log('name变了')
    }
    }

vue-router

  • 容器

    1
    <router-view><router-view>
  • 跳转路由标签

    1
    <router-link to="/a"><router-link>
  • router函数操作

    1
    2
    3
    4
    5
    6
    7
    8
    9
    10
    this.$router.push()

    // history是一个栈
    push(string | object) // 入栈
    replace(string | object) // 替换最后一个历史记录(当前)
    go(int) // 前进后台

    $route 获取路由信息

    $router 控制路由跳转
  • 监视路由

    1
    2
    3
    4
    5
    6
    7
    8
    9
    // 1.watch - 不推荐
    简单-只能看不能操作
    watch: {
    $route(value, old_value){
    console.log(value, old_value)
    }
    }

    // 2.路由守卫
  • 路由表

    1
    2
    3
    4
    5
    6
    7
    8
    9
    10
    11
    12
    router = new VueRouter({
    routes: [
    {
    path: '/a',
    component: { template: '<div>我是组件a</div>' }
    },
    {
    path: '/b',
    component: { template: '<div>我是组件b</div>' }
    }
    ]
    })
  • 多视图

    1
    2
    3
    4
    5
    6
    7
    8
    9
    10
    11
    12
    13
    14
    15
    16
    17

    <router-view name="header"><router-view>
    <router-view><router-view>
    <router-view name="footer"><router-view>

    router = new VueRouter({
    routes: [
    {
    path: '/a',
    components: {
    defaulte: {template: '<div>我是组件a</div>'},
    header: {template: '<div>我是头部</div>'},
    footer: {template: '<div>我是底部</div>'}
    }
    }
    ]
    })
  • 路由嵌套
    使用children

    1
    2
    3
    4
    5
    6
    7
    8
    9
    10
    11
    12
    13
    14
    export default {
    routes:[
    {
    path:'/index',
    name:'index',
    children:[
    {
    path:"/1",
    component:{template:'<div>1111</div>'}
    }
    ]
    }
    ]
    }

了解三大框架

1
2
3
vue	
react
angular

现代开发模式- 20%表现层

1
2
vue/react
vue的核心是数据

传统开发模- 80%表现层

1
2
jQuery
需要花大量时间在表现层上面

vm结构

1
2
3
4
new Vue({
el,data,methods
computed,props,watch,template,router,...
})

概念

  • 数据同步
  • 双向绑定
  • 虚拟DOM:通俗说就是一个大json,存着各个节点数据
    • 合并请求
    • 快速查询
    • 局部刷新

vue指令(directive)-补充了html的属性

  • v-bind:给属性绑定数据

  • v-model:数据双向绑定

    • 数据(data)和input之间双向
    • view(html) <-> controller(VM) <-> model(data)
    • MVVM模式,model层通过controller层(VM)与view层进行数据双向绑定
  • v-text:将数据以文本形式绑定到标签中,类似innerText

  • v-html:将数据转成html再绑定到标签中,类似innerHTML

  • v-on:绑定事件,如: v-on:click=””

  • v-show:隐藏显示标签

  • v-if:跟v-show效果相同,但是v-if会删除和重新渲染dom节点,而v-show是通过display:none样式隐藏

  • v-for:循环渲染数据,需要配合key使用

    • 数组 v-for=”(item,index) in array”
    • json v-for=”(val,key) in json”
    • 字符串 v-for=”(char,index) in string”
    • 数字 v-for=”i in number”
  • v-pre:预编译,提高性能,例如:
    div标签有等不需要编译的文本,可以给div标签加v-pre指令,直接输入”“文本

  • v-cloak:在页面还未进行编译时,隐藏双向绑定的标签
    需要配合下面样式使用

    • *[v-cloak]{ display:none }

简单的实现双向绑定代码

1
2
3
4
5
6
7
8
9
10
11
12
13
14
15
16
17
18
19
20
21
22
23
24
25
26
27
28
29
30
31
32
33
34
35
36
37
38
39
40
41
42
43
44
45
46
47
48
49
50
51
52
53
54
55
56
57
58
59
60
61
62
63
<!DOCTYPE html>
<html lang="zh-CN">
<head>
<meta charset="UTF-8">
<meta name="viewport" content="width=device-width, initial-scale=1.0">
<meta http-equiv="X-UA-Compatible" content="ie=edge">
<title>双向绑定基本原理</title>
</head>
<body>
<div id="app">
<input type="text" v-model="name">
姓名:{{name}} <br>
年龄:{{age}}
</div>
<script>
// 获取需要渲染的盒子
let el = document.getElementById('app')
// 保存盒子的内容
let template = el.innerHTML
let _data = {
name: '小明',
age: 18
}
// 使用Proxy拦截,数据被修改时触发事件
let data = new Proxy(_data, {
set(obj, name, value) {
obj[name] = value
// 数据变了,需要重新渲染
render()
}
})

// 首次加载页面渲染
render()

function render() {
// 渲染函数
el.innerHTML = template.replace(/\{\{\w+\}\}/g, str => {
str = str.substring(2, str.length - 2)
return _data[str]
})

// 找所有的v-model
// 获取所有的input标签
el.querySelectorAll('input').forEach(ele => {
// 判断是否有v-model属性
let key = ele.getAttribute('v-model')
if (key) {
// 给有v-model的input标签赋值
ele.value = _data[key]

// 监听input标签
ele.oninput = function () {
data[key] = this.value
}
}

})

}
</script>
</body>
</html>

koa 使用

  • 首先需要初始化一个项目

    1
    npm init
  • 然后安装 koa

    1
    npm install koa -D
  • 新建一个server.js

  • 引入koa及koa路由

    1
    2
    const koa = require("koa");
    const Router = require("koa-router");
  • 使用koa类

    1
    let server = new koa();
  • 监听8080端口号

    1
    server.listen(8080);
  • 使用koa路由类

    1
    let router = new Router();
  • 添加一个路由

    1
    2
    3
    4
    5
    6
    7
    router.get("/login", async ctx => {
    if (!ctx.query.user || !ctx.query.pass) {
    ctx.throw(400, "user and password is required");
    } else {
    ctx.body = "成功";
    }
    });
  • 将路由添加到server上

    1
    server.use(router.routes());

koa

  1. v1 generator
  2. v2 过渡版 gennerator&async
  3. v3 async/await

路由方法

  1. get
  2. post
  3. all (所有方法都认)

嵌套路由

  1. koa将路由独立出来,可以将路由嵌套
    1
    2
    3
    4
    5
    6
    7
    /user
    /company
    /
    /admin
    /news
    /sport
    /woman

传参

  1. urlencoded传参 http://k.com/user?a=1
    • 灵活
    • 可省略
  2. params传参 http://k.com/user/1
    • 利于seo(相对静态)

后台获取信息

  1. ctx.params
  2. ctx.query
  3. ctx.method
  4. ctx.url

  1. server.context: 相当于ctx的原型(prototype)

  1. ctx.request
  2. ctx.response
    信息

  1. ctx.method 请求方法
  2. ctx.url
  3. ctx.path
  4. ctx.query get数据
  5. ctx.ip 客户端的ip
  6. ctx.headers 请求头

错误处理

  1. ctx.throw(code, msg)
  2. ctx.assert(条件, code, msg)

  1. ctx.state=305 (状态码)
  2. ctx.redirect(‘http://www.baidu.com') (重定向到其他页面)
  3. ctx.attachment (发送文件给用户)
    安装koa-static(访问静态页面)

1
npm install koa-static -D
1
2
3
4
5
6
7
// 引入
const static require('koa-static');
// 使用
server.use(static('./static'), {
maxage: 86400 * 1000, // 单位:毫秒
index: 'index.html ' // 默认访问文件
})

安装koa-better-body

1
2
3
npm koa-beeter-body -S
// 支持文件数据,json数据,formData数据
ctx.request.fields //获取请求的参数

cookies

1
2
3
4
5
6
7
8
9
10
11
12
13
server.keys=['sdfg','sdfsdfsdfs']
server.use(async ctx => {
ctx.cookies.set('user', 'bule', {
// 配置
maxAge: 14 * 86400 * 1000, // 有效期
signed: true // 签名的
})

console.log(ctx.cookies.get('user',{signed:true}))
// 签名,在设置和获取时,都需要将signed设置为true
})
// ctx.cookies.set()
// ctx.cookies.get()

session

1
2
3
4
5
6
7
8
9
10
11
12
13
14
15
16
// 需要引入
const session = require('koa-session');
server.keys=['sdfg','sdfsdfsdfs']
server.use(session({
maxAge: 20 * 60 * 1000, // 有效期
renew: true // 自动续期(用户有任何操作,有效期重新计算)
}, server)
)

server.use(async ctx => {
if(!ctx.session['view']){
ctx.session['view']=0;
}
ctx.session['view']++;
ctx.body=`欢迎你第${ctx.session.view}次来访`;
})

数据库

1
npm install mysql co-mysql -D
1
2
3
4
5
6
7
8
9
10
11
12
13
14
15
16
17
18
19
20
21
22
23
const mysql = require('mysql');
const co = require('co-mysql');

let conn = mysql.createPool({
host: 'localhost',
user: 'root',
password: '',
database: '2018'
})

let db = co(conn);

let server = new Koa();
server.listen(8080);

server.context.db=db;

server.use(async ctx => {
let data = await ctx.db.query('SELECT * FROM item_table');

ctx.body = data;

})

koa服务器渲染

服务器渲染 pug/ejs

  1. 安全性
  2. SEO

客户端渲染 Vue/React

  1. 节约流量
  2. 用户体验

服务端 – 模板引擎
pug(jade) 侵入式

1
npm i pug -D
1
2
3
4
5
6
7
8
9
10
11
12
13
14
15
16
17
18
19
20
21
22
23
24

const pug = require('pug');

pug.randerFile('./template/1.pug', {
pretty: true
}, (err, data) => {
if (err) {
console.log('渲染失败');
} else {
console.log(data)
}
})


// 建立1.pug(模板),内容如下
dctype
html
head
meta(charset="utf-8")
meta(name="网站名",content="test")
title test
script.
console.log(1212)
body

ejs 非侵入式

1
npm i ejs -D
1
2
3
4
5
6
7
8
9
10
11
const ejs = require('ejs');

ejs.randerFile('./template/1.ejs', {
name: "小明"
}, (err, data) => {
if (err) {
console.log('错了');
} else {
console.log(data)
}
})
1
2
3
4
5
6
7
8
9
10
11
12
13
// 建立 2.ejs , <% 中间写js代码 %>
<!DOCTYPE html>
<html lang="en">
<head>
<meta charset="UTF-8">
<meta name="viewport" content="width=device-width, initial-scale=1.0">
<meta http-equiv="X-UA-Compatible" content="ie=edge">
<title>Document</title>
</head>
<body>
<%=name%>
</body>
</html>

为何搭建博客

在2017年年底时,我就准备搭建一个博客,主要是作为一个vue实战项目练手(刚好学习了vue)以及作为实习面试的作品,然后利用业余时间完成自己一个版的博客,部署到了阿里云上面

由于部署在阿里云上面,每年是需要支付服务器、域名的费用。所以当我发现hexo框架时,所以重新使用hexo重新搭建了一个博客,只需要部署到github上面就行了,图片上传到七牛云,降低维护成本,因为github访问速度太慢了,后面又将项目重新部署在gitee

以前弄博客是为了练习和当作面试的一个作品,现在写博客主要是为了记录和分享自己所学的东西

记录一下旧的blog页面


前端使用vue全家桶,build后是单页面,seo太差,加上需要服务器费用,所以也就放弃维护了

桌面浏览器主页


桌面浏览器主页

桌面浏览器关于


桌面浏览器关于

桌面浏览器留言


桌面浏览器留言

移动端导航


移动端导航

移动端首页1


移动端首页1

移动端首页2


移动端首页2

移动端首页3


移动端首页3

移动端关于


移动端关于

移动端留言


移动端留言

后台管理


后台使用php,mysql

文章列表页


文章列表页

文章编辑页


文章编辑页